Labels

Showing posts with label Recipes. Show all posts

Thursday, August 8, 2013

My Fried Rice


I am typically not a fan of rice.  I have to be in the mood for it, and then I tend to only like it certain ways.  The other day I randomly got a craving for fried rice, which was odd, normally if I'm presented with fried rice I just pick the veggies out and eat them.  So I decided to take a stab at making my own. I must say if all fried rice tasted this good I'd eat rice a heck of a lot more than I do!  Now I know you just have to trust me that its delicious until you make it yourself, but if it helps, my brother in law said it was "Amazing" and my husband said it was "hands down the best fried rice I've ever had".  On top of being yummy this recipe is all natural, and free of any chemical laden foods that may be used in the making of fried rice you get from the store or restaurant. I also promise its not complicated at all!


Now this recipe is for quite a bit more food than my usual recipes.  Yes, I did make this to take for lunch, but I also made enough for my husband and brother in law to have some for lunch too.  

What You Need:

2 Cups Jasmine white rice
4 Cups water
5 eggs
1/2 Cup cooked carrots (I diced fresh organic carrots and boiled them till they were tender)
1 1/4 Cup frozen organic peas
3 tbs garlic pepper salt (I use a premixed blend)
3 tbs soy sauce

What You Do:

In a sauce pan combine the 4 cups of water and 2 cups of rice, and bring to a boil.  Once boiling turn down to a simmer.  Simmer the rice until there is no standing water.  Do check on it to ensure the rice doesn't scorch. Once the standing water is gone turn the heat off and let it sit in the pot with the lid on it while you do the remaining steps.  

In a large frying pan (I used a deep one) crack one egg into the pan, scramble it.  When the first egg is about 2/3 way cooked add another egg and continue to scramble.  Do this with each egg until you have all 5 cooked through.  By adding the eggs one at a time directly to the pan, instead of whipping them in a bowl, you get smaller egg pieces, and you get that lovely yellow and white color combo in the scrambled egg bits.  Add the peas, carrots, and garlic pepper salt.  Constantly stir till the peas and carrots are heated through.  Then add the cooked rice, and the soy sauce. Stir till everything is well mixed.  Let it saute for about 5 more min, stirring every min or so.  Then remove from the heat, serve and enjoy!


If you like to eat fried rice as a dish by itself you can add any sort of meat, or tofu you like.  I added leftover grilled chicken thighs that my husband had grilled us for dinner.  I just cubed it up and added it to the serving I made myself for lunch. 


Friday, July 12, 2013

Lox For Breakfast

The idea of Lox and cream cheese on a bagel is definitely not my original idea, but I wanted to share this with those of you who may not have seen or heard of this yummy breakfast delight before.  For those of you who don't know about Lox, its nothing more than smoked salmon, and its easy to find.  The one I used for this recipe I got at Whole Foods, and it was only $5.00 for a decent sized package (sorry I am typing this from work and there is no one at home to tell me the weight of the package I got. I will add an update with it though when I can Ü), but I know you can get it at a regular grocery store, and we've even bought some at Sam's Club.  For the recipe below I only made enough for me to take for breakfast this morning, but larger quantities can always be made and kept in the fridge.   


Ingredients:

2.5 Heaping tbs cream cheese
1.5 Heaping tbs chopped Lox
1/2 tsp chopped fresh dill
1 tsp capers
2 tbs diced tomato

Combine the cream cheese, Lox, dill, and capers in a bowl and mix all together well.  Smear onto both halves of a freshly toasted bagel of your choice.  In the picture I've got a pumpernickel bagel. 

If you don't want to mix everything into the cream cheese you can also spread the plain cream cheese onto your bagel and layer the rest of the ingredients on top. 

Wednesday, June 19, 2013

Fresh and Clean Grilled Chicken Salad

Today I am sharing the best chicken salad I've made to date!  I wish I could publish a scratch and sniff blog so you could see how amazing it smells.  It helps that my husband definitely qualifies for the title of Grill Master, so I got to start with some really yummy grilled chicken.   Also, if you've read some of my other recipes you may notice that I tend to use Avocado where you would typically use mayonnaise.  Avocado adds the same creamy texture, and works just as well as a binder as mayo does.  Avocado is just much healthier than mayo, and it also helps keep your dish light and fresh. 


Ingredients:                                                                         Serves 1

1 Grilled chicken drumstick (I used one left over from a dinner)
3 cherry tomatos
1 tbs diced scallions
1/8 cup diced green bell pepper (I used green but use any color you like)
10 Hamburger dill sliced pickles
1/4 ripe avocado
Salt and pepper to taste

My husband made grilled chicken drumsticks for dinner last night, and I used one of those for this salad.  I just pulled the meat off the bone with my fingers and roughly chopped it into smallish chunks.  I cut each cherry tomoato into 8 chunks.  I am definitely a fan of dill pickles, so I used 10 hamburger slices and I just roughly cut them into chunks. 
Add the chicken, chopped tomaotos, scallions, bell pepper, pickles and salt and pepper to a bowl.  Mash the avocado separately then add to the salad mixture and mix all the ingredients together well.  In the picture I've served mine on Orowheat Dark Rye Bread that was lightly toasted.  You can use any bread, crackers, or spoon you'd like!


Many of my recipes show that they only serve one.  I often make these dishes to have as breakfast (as in the gourmet egg salad) or lunch for my work day, so I only make enough for myself. Of course they can be doubled, tripled, etc if you want to feed more than just you!  Also by not using the mayo this dish isn't as refrigerator sensitive as a salad with mayo would be.  Whenever possible I like to let foods I'm not planning to heat just sit on my desk until my lunch.  When your ingredients have had a chance to hang out together at room temperature all the flavors will meld together so much better. 


Friday, June 7, 2013

Yummy Ground Chicken Sandwhich

I know I haven't been very good about keeping up on sharing my recipes with you guys, but my husband has been doing a lot of our dinner cooking (he is awesome like that).  We got some ground chicken breast to try, and I wanted to make myself a chicken sandwich with some. We went to the Farmer's Market this weekend, where I got some green garlic.  I've been wanting to try some for a while, and this is my first time using it.  Its just garlic with the plant part still attached.  The plant part looks like the top green part of the green onion, and that’s the part I used in this.  I had it for lunch today and it was so good.  It was moist, flavorful, and filling.  My recipe is below. 


Ingredients:                                                                     One Serving

Chicken Patty
1 cup ground chicken breast
1 table spoon chopped green garlic greens
1 table spoon finely chopped white onion
1 table spoon diced jalapeño (to taste, I like heat)
Salt and ground black pepper to taste

Avocado condiment
1/2 an avocado
1 table spoon capers with at small amount of the brine
Fresh ground Black Pepper


For the chicken patty mix all the ingredients together, and form into a patty.  Fry in a frying pan.  When I make something I need cooked all the way through, but I don't want dry I put a lid on the pan and cook it on a low heat.  This makes sure its cooked through, but its still moist when you eat it.  When you're sure its cooked through take the lid off and let it cook for a few min on each side to get the color you want. 

For the avocado condiment I mashed the avocado and the capers together in a bowl.

For the sandwich you see here I used a "white wheat" hamburger bun form a grocery store here called Sprouts (very similar to Whole Foods, but usually not so expensive).  I lightly toasted the bun, added the avocado condiment, placed my patty on top of the condiment.  Then I added smoked Gouda cheese, and some pea shoots that we also got at the Farmer's Market.  Any kind of sprout would be just as good, and you can get them in the area where the salad mixes are at your grocery store. 


Wednesday, April 17, 2013

Quinoa for breakfast and lunch!


You may be asking "What is Quinoa?"  Quinoa is a grain-like crop grown primarily for its edible seeds. Quinoa looks like couscous and is as versatile as rice, but tastes richer than either of them. It's also healthy and can be enjoyed at any meal time.  I actually have both breakfast and lunch/dinner recipes for it today!  Quinoa is not hard to find, or hard to cook.  We buy it at Target, or Whole Foods and it comes in a resealable bag (if you get it at Whole Foods you can also find it in the self service bins, and that may be ideal for your first try it purchase).  Its cooked very much like rice.  One cup of water and one cup of Quinoa.  Bring to a boil and let simmer till its tender.  This morning I had it for breakfast, like a hot cereal (picture on the left).  I'm also having it for lunch in a Quinoa chicken salad (Picture on the right).  Both recipes are super yummy, easy, and quick.  Recipes below Ü


Breakfast Qinoa:                                                                                          1 serving

2/3 a cup cooked quinoa
1/8 Cup chopped walnuts (use any nut you like)
1/8 cup golden raisins
1/2 tsp brown sugar (I use homemade brown sugar, and I'll give instructions for that at the end)
Milk to taste

Directions:

Mix all the ingredients in a bowl and enjoy.  I like enough milk on mine to have it a little bit of milk over the top when its sitting, but my husband likes it with quite a bit less. If you're not a fan of raisins you can use any dried fruit, like cherries, cranberries, apricots, figs, or whatever you like!


Making your own brown sugar is super easy, and I love how it tastes.  Much better then store bought in my opinion.  All you do is add 1tbs of molasses to 1 cup of sugar.  You blend the two together with a fork until all the sugary molasses chunks are gone.  The fresh brown sugar adds an earthiness the store bought is very much lacking. 


Chicken Quinoa Salad:                                                                          6 Servings

2 Chicken breasts boiled (add season salt to water chicken is boiled in) and roughly chopped
3/4 Orange Bell pepper roughly chopped (any color will do, I used orange for this batch)
1/8 cup chopped onion
3/4 cup roughly chopped dill pickles
1 cup cooked quinoa
2 cubed avocados


Directions:

Mix all the ingredients in a bowl and enjoy.  It can be eaten on toast, crackers, or just with a spoon.  Everything can be added to taste.  If you don't like the amounts of onion, bell pepper pickles, or avocado please feel free to adjust the amounts to your taste.  You can also add celery for a nice crunch, or add grapes or raisins to make it a little sweeter.  I did not use any mayo in this salad. The avocado is my mayo substitute. It adds the creamy binder you look for from mayo, but the avocado tastes better, and is so much healthier. 

Monday, April 15, 2013

Ground Turkey Stuffed Bell Peppers

Today I bring you some super yummy stuffed bell peppers!  They were made with ground turkey, so they still qualify as healthy.  This dish is a great way to sneak some vegetables in if you have a picky eater, even if they won't eat the pepper.  Also if you have someone who may be hesitant to try the ground turkey just don't tell them its turkey!  We have a super picky eater in our house who loved them.  Had he known it was ground turkey he wouldn't have even tasted them. This recipe is pretty basic, but if we'd had celery and mushrooms on hand I would have added them as well. 


Ingredients:                                                                    Serves 4; one whole bell pepper each

2lbs ground turkey
4 Bell Peppers (any color you'd like)
1/2 cup shredded carrots
1/8 cup chopped onion
1/2 cup spaghetti sauce
3/4 cup mashed potato flakes

Directions:

Preheat oven to 400 degrees
Mix ground turkey, shredded carrots, chopped onions, spaghetti sauce, and potato flakes into a bowl and mix together with garlic powder, salt and pepper to taste. 
Cut bell peppers in half length wise, remove stem and seeds. 
Spoon filling into peppers and place peppers in a baking dish (any you feel comfortable with)
Place in oven an bake uncovered 30-45 min


There is no need to go out and buy shredded carrots for this dish unless you want to.  I used the small side of my cheese grater and shredded one myself.  As I mentioned before I would have also tossed in some celery and mushrooms if we'd had them.  Also you can add the salt, pepper, and garlic powder individually if you like, but we buy a pre mixed garlic pepper salt a the dollar tree that I really like.  Be careful you don't over salt if you use that. 

For those of you who like a little spice, my husband had the great idea of trying this stuffed in a chile pepper.  I'll let you know how that turns out ☺

Friday, April 5, 2013

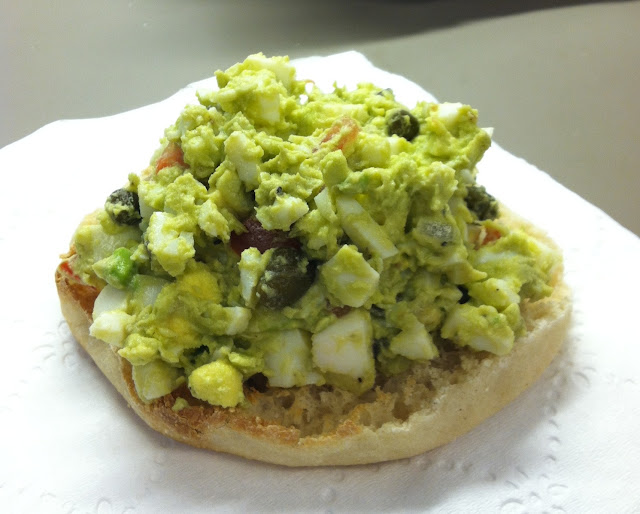
Gourmet? Egg Salad

I must say this healthy eating choice really has my cooking creative juices flowing.  Today I have for you a great idea for some of those hard boiled eggs you may have left over from Easter. 

This super yummy, and healthy, egg salad only has 5 ingredients; Eggs, avocado (instead of the traditional mayo), tomatos, purple onion, and capers.  Now I know I said I wouldn't be using anything expensive or hard, and I have to say that I promise Capers are not as intimidating as they sound.  If you've never had one I suggest you find somewhere in your area that has a bulk olive bar, and ask for a sample.  These briny little delights add a perfect salty crunchy element to your dishes, and they are soooo good.  If you don't have a grocer with an olive bar you can buy them in jars in the isle with the pickled stuff.  They come in little jars (I believe I paid $2.99 for the jar I have, which I got at Sprouts), but a little jar goes a long way.  I ate my egg salad for breakfast on top of half a toasted English muffin, but of course you can use crackers or any bread you'd like.  My friend ate the little bit I had left in the container I brought it to work in with just a spoon!  Now that I've got you, hopefully, drooling over the picture please see the recipe below it.


Ingredients 

4 Hard Boiled Eggs
1/2 an avocado
1/4 cup chopped fresh tomato (any kind of tomato you like)
1 Tbs finely chopped purple onion (adjust to your taste, and you can use any onion I like the purple for the color)
1 heaping tsp capers


Directions

Chop your hard boiled eggs like you would for any normal egg salad.  Mash half the avocado and combine with the eggs.  Add the chopped tomatos, chopped onion, and capers.  Mix all the ingredients well.  Finish with a bit of fresh ground black pepper (the capers will take care of the salt you'd want)

Serve on toast, crackers, or eat with a spoon!


Friday, November 16, 2012

Jalepeño yummies

I often use something I saw on Pinterest as a starting point for something I want to make, like these. I made these to take to a branch potluck at work, so my recipe makes about 75 of them Here is my recipe :)


WHAT YOU NEED:
2 packages won ton wrappers
2 boxes of cream cheese
3 cups shredded sharp cheddar cheese
1/4 cup finely diced onion
1 cup sliced pickled jalepeños
Oil for frying.

WHAT YOU DO:
In a bowl combine the cream cheese, cheddar cheese, and onions. Then dice the sliced jalepeños and add them to the cheese mixture.

Take your won ton wrapper and put a little water on 2 adjacent sides for sealing purposes (I used my finger to apply the water). Then add a little spoonful (how big a spoonful is really up to you, but don't add so much you won't be able to seal your won ton) of your jalepeño cheese mixture to the center of the won ton. Then fold your won ton in half over the filling. Do this so that the dry wonton sides meet up with the sides you applied water to. Press them together to seal, and drop them into your hot oil. Fry them about 2 min on each side, or until they're golden brown and delicious!!!

Wednesday, October 31, 2012

Finger cookies

I absolutely LOVE Halloween. This year I found a picture on Pinterest (I'm a Pinterest junkie in case you couldn't tell) of some sugar cookie fingers. So on Monday when my husband was at Walmart he got me a package of Pillsbury sugar cookie dough (the one with 24 cookies already semi shaped on the little cardboard thingy), and a small bag of sliced almonds.

Making these was SO much fun. We cut each cookie dough section into 4, rolled the out a little, added and almond to one end and baked them at 350 for 5-8 min.

After making a sheet or two I thought about how I could have gotten some red chocolate melting chips to dip the non nailed ends in (I was even at Hobby Lobby yesterday). So I rifled through our cabinets and found some red decorating sugar. They turned out awesome!

Sunday, October 28, 2012

Little Lemon Soufflés

Another one from pinterest that came out great!!! I am going to try a different citrus next time. Oh and I had TONS of lemon juice left over.


8 large lemons, I bought a bag from Walmart.
3 large eggs, separated
1/2 cup granulated sugar
2 tablespoons all-purpose flour
Confectioners' sugar, for dusting (I didn't use)


Directions

Preheat oven to 350 degrees. Line a baking sheet with parchment. Trim tip end from a lemon so fruit sits level. Cut stem end one-third of the way down, making cut parallel with bottom; reserve top. Repeat with remaining lemons.

Hold a lemon above a sieve set over a bowl, and scoop out the pulp. Squeeze the juice from the pulp, and reserve. Repeat with all lemons. Place shells on prepared baking sheet. (I squeezed by hand the pulp and used a spoon to fish out the seeds that slipped through)

Combine egg yolks, 1/4 cup granulated sugar, 1/4 cup reserved lemon juice, and flour in the heat-proof bowl of an electric mixer fitted with the whisk attachment. Beat mixture on medium speed until pale yellow, about 3 minutes. Place bowl over a pan of simmering water; whisk constantly until very thick, about 8 minutes. Remove bowl from heat, and return to mixer. Beat on medium speed until cool, scraping down sides several times, about 10 minutes. Transfer to a medium bowl, and set aside.

Combine egg whites and remaining 1/4 cup granulated sugar in clean mixer bowl. Place the bowl over the pan of simmering water, and stir until sugar has dissolved and mixture is warm to the touch. Remove bowl from heat, and return to mixer; beat on low speed until frothy. Gradually increase speed until meringue is shiny and holds soft peaks, 2 to 3 minutes, being careful not to overbeat.

Whisk 1/3 of the meringue into the yolk mixture. Gently fold in the remaining meringue. Carefully fill the prepared lemon shells to just below the rims.
Transfer baking sheet to oven, and bake until meringue is slightly golden and rises about 1 inch above the shell, about 14 minutes. Remove from oven, and transfer to serving plates. Garnish with the reserved lemon tops, and dust with confectioners' sugar. Serve immediately.

Monday, October 22, 2012

Cinnamon raisin pull apart bread.

So this is a Pinterest recipe tweak.

Need
1 can of jumbo non flaky biscuits (I used Walmart brand)
1/2 cup sugar (I had white, but I bet it'd be great with brown)
2 tbs of cinnamon
2 little boxes of raisins
Bunt pan (any pan will work if you don't have one)

Preheat oven to 350. Throw your stick of margarine into the bunt pan and let it melt in the oven while you do the rest.
In a big mixing bowl combine cinnamon, sugar, and raisins.
Cut biscuits into quarters and add to bowl.
Evenly coat biscuit pieces in cinnamon sugar raisin mixture.
Evenly distribute into bunt pan and bake at 350 for 30 min or until tip is golden brown and crispy.